

 187
187
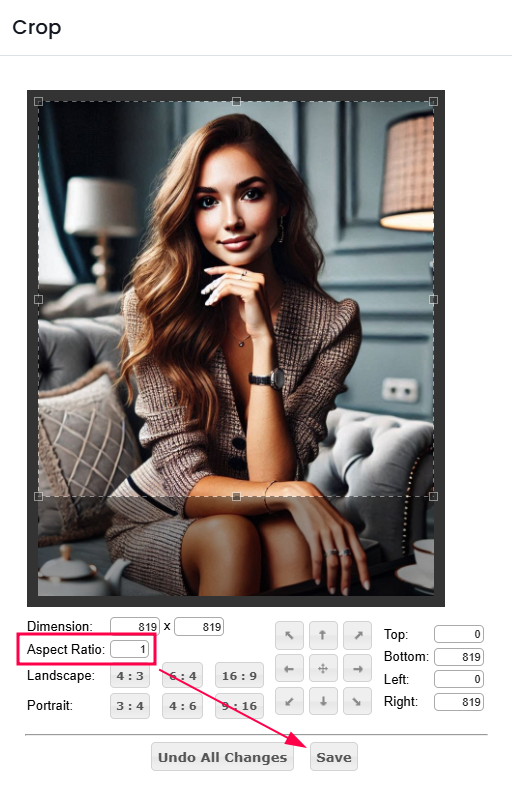
Properly cropping your photos before uploading to APT is crucial to ensure they display correctly on the website. All photos must be cropped to a perfect square (1:1 aspect ratio). Otherwise, they may be awkwardly cropped when displayed, leading to unbalanced or unprofessional-looking images.
Additionally, ensure your photo is high quality and not too small in file size. Low-resolution images may appear stretched and pixelated, reducing their overall clarity and impact. We recommend uploading photos that are at least 800x800 pixels. The simple steps below can ensure your photos meet the required dimensions for APT, helping maintain a polished, professional website appearance.
Perfect 1:1 Ratio examples:


Cropping A Photo
You can crop a photo directly on your device or upload and crop it within APT. If you are a MAM, you also have the option to use the Agent Headshot Template in Creative Center.
Steps to Crop a Photo in APT
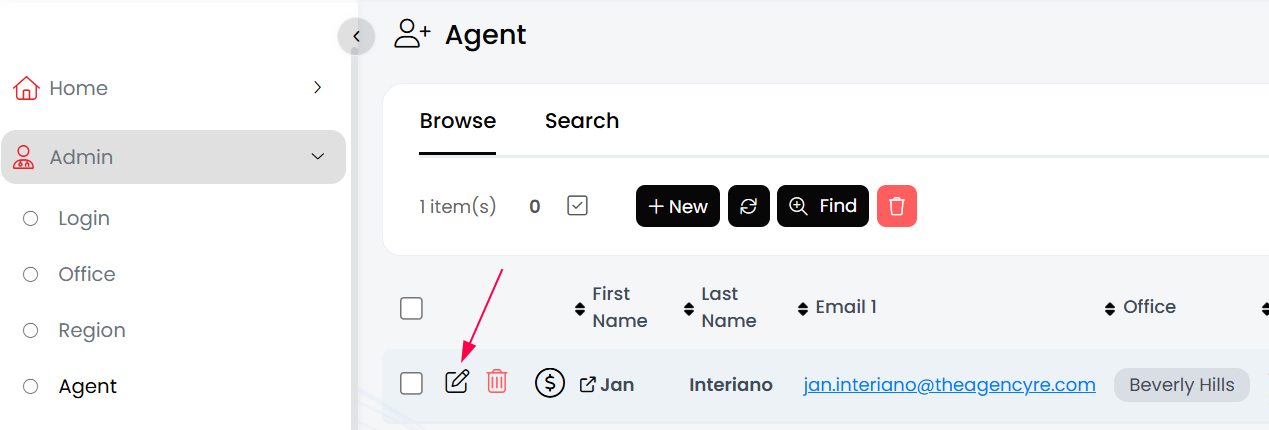
- Open the agent’s profile in APT by clicking the Edit pencil.
- Scroll down to the Picture field and select Upload Square Photo.
- After uploading, the crop tool will appear below the photo.
- Click the crop icon and adjust the aspect ration to 1.
- Save your changes.

Videos for reference:
How To Use The Creative Center Agent Headshot Template Available to MAMs To Crop A Headshot To Be A Perfect Square
How To Upload An Agent Headshot To An Agent Profile in APT
How To Use Agent Headshot Crop Tool Directly in APT (If You Don't Use the Creative Center Agent Headshot Template)
-------------------------------------------
Additional ways to crop a photo:
Steps to Crop a Photo to a Square Using Windows 11 Photos App
- Open the Photos app and locate the photo you want to crop.
- Double-click the photo to open it in the editor.
- Click the Edit image button (pencil icon) at the top of the screen.
- In the editing toolbar, click Crop & Rotate.
- Select the Aspect ratio dropdown menu (usually found on the right or bottom of the app).
- Choose Square (1:1) from the list.
- Adjust the cropping frame to include the desired portion of the photo.
- Click Save a copy to avoid overwriting the original file.
Steps to Crop a Photo to a Square Using iOS (iPhone/iPad)
- Open the Photos app and locate the photo you want to crop.
- Tap the photo, then tap Edit in the top-right corner.
- Tap the Crop/Adjust icon (a square with two arrows) at the bottom.
- Tap the Aspect ratio button (a rectangle with overlapping squares) at the top-right or bottom-left corner, depending on your version.
- Select Square or 1:1 from the aspect ratio options.
- Adjust the cropping frame by dragging the edges as needed.
- Tap Done to save your changes.
Steps to Crop a Photo to a Square on macOS (Apple Computer)
- Open the Photos app and find the photo you want to crop.
- Double-click the photo to open it, then click the Edit button in the top-right corner.
- Select the Crop tab on the right-hand toolbar.
- Click the Aspect button and choose Square from the dropdown list.
- Adjust the cropping frame by dragging the corners or edges.
- Click Done to save the changes.
Apple Support Article: https://support.apple.com/guide/photos/crop-and-straighten-photos-and-videos-pht13f0918f0/mac

